Now that Google Hangouts On Air is shutting down, the only alternative for content creators is to turn to YouTube Live Events.
Google Hangouts On Air have seen an incredible journey from when it was first released to now as it’s being retired and absorbed by YouTube Live Events. Many of us saw how one indy artist helped give birth to a new era of live streaming concerts and a new breed of online “show”.
Our team has helped countless brands launch their first Hangout On Air and even produce HOA series worthy of IMDB.
While we’re sad to see it go, many of us always saw the final destination of Hangouts On Air (or at least the evolution of it) to be with YouTube and the vast audience it is able to reach.
In this post I’m going to walk you through how to use YouTube Live Events to create LIVE video content for the first time. It’s worth noting though that you don’t need to actually broadcast live to real-time viewers– YouTube Live Events are also great for an easy way to record video that is automatically uploaded to YouTube and can be edited and/or downloaded from there.
With that said, let’s begin!
[clickToTweet tweet=”Learning how to do my own YouTube Live Event!” quote=”Learning how to do my own @YouTube Live Event!”]
Step 1: YouTube Live Streaming
The first thing you’ll need to do is log into YouTube and click on your profile picture in the top-right corner of your browser. Once you do that, a menu will drop down with a button labeled Creator Studio. Click that.
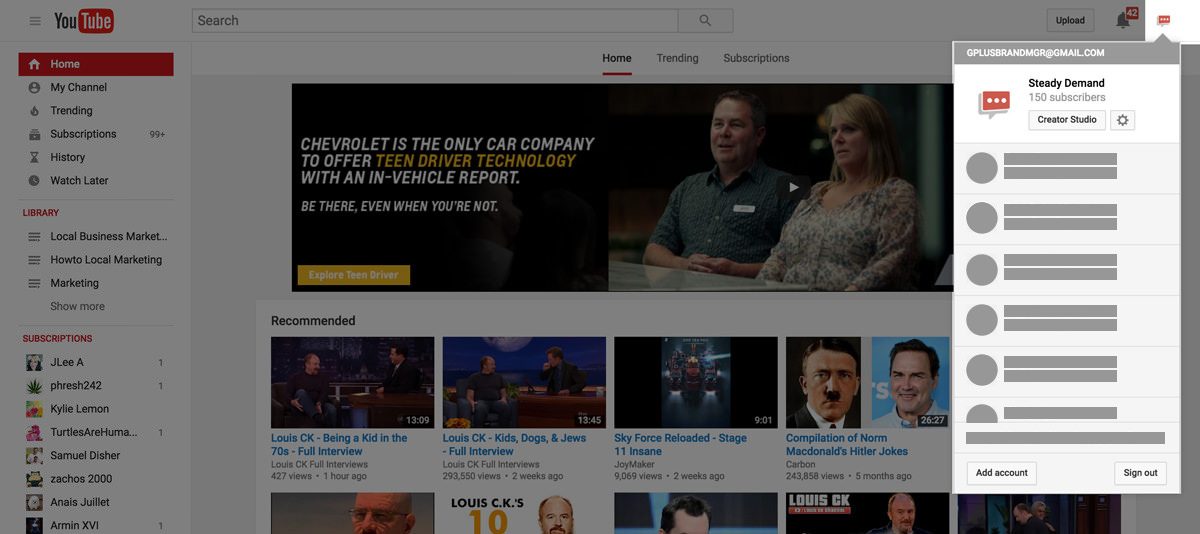
You will then land on your Dashboard where you can view all sorts of stats for your channel.
From there, on the left side of your screen is a menu and one of the tabs is labeled Live Streaming. Click on that tab.
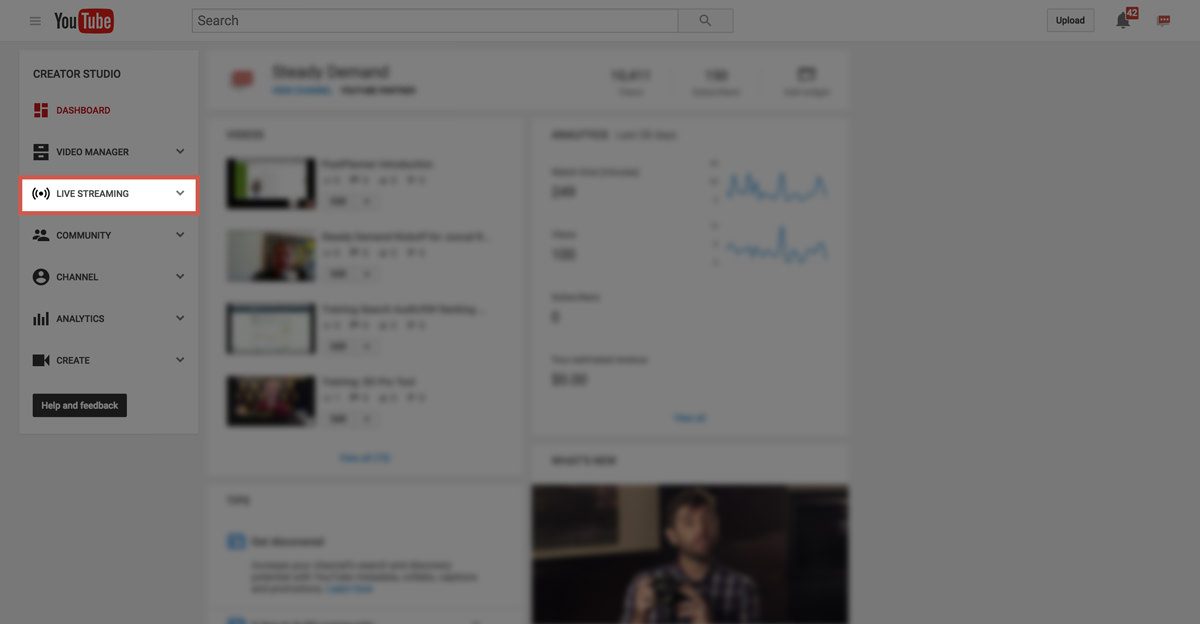
Now, in most cases YouTube will navigate you to the Stream Now (Beta) sub-page of this tab. This is not what you’re looking for. Instead, click on the Events tab just below the one you are currently on.
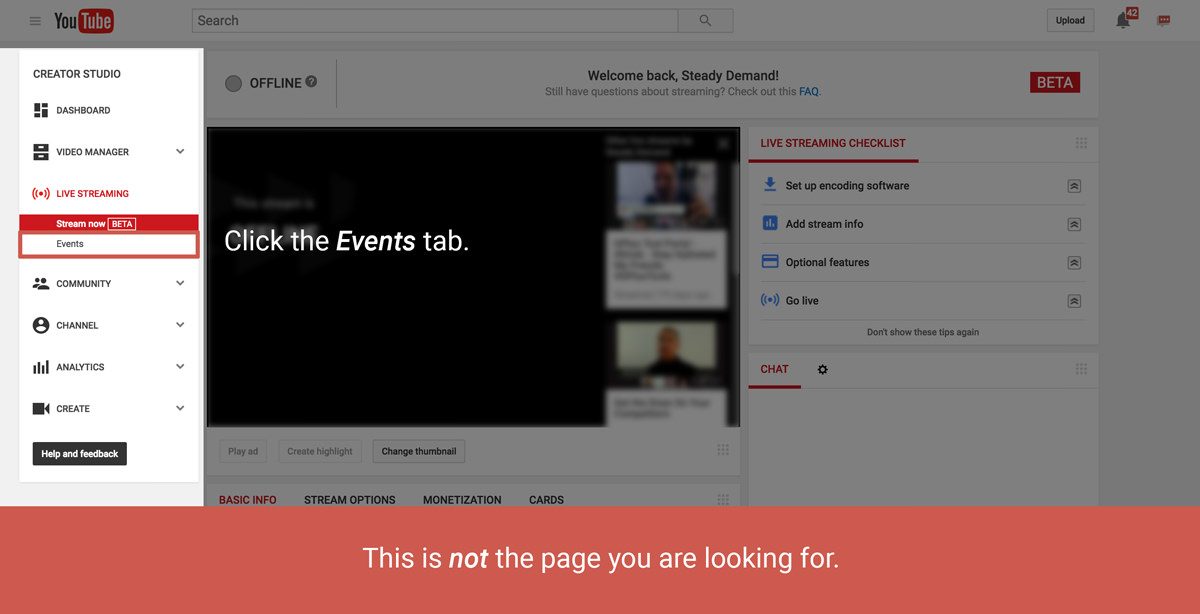
Now, you’re finally at the YouTube Live Events dashboard. It’s definitely more work than it should be, and hopefully YouTube recognizes this and begins making it simpler now that their emphasis has shifted from Hangouts On Air.
Step 2: Create a New Live Event
To create a new Live Event, click on the button in the top-right of the page with the obvious label.

At all costs, avoid the blue banner that you might see at the top that deceptively says, “Try a faster and easier way to stream” with the accompanying “Go Live Now” button.
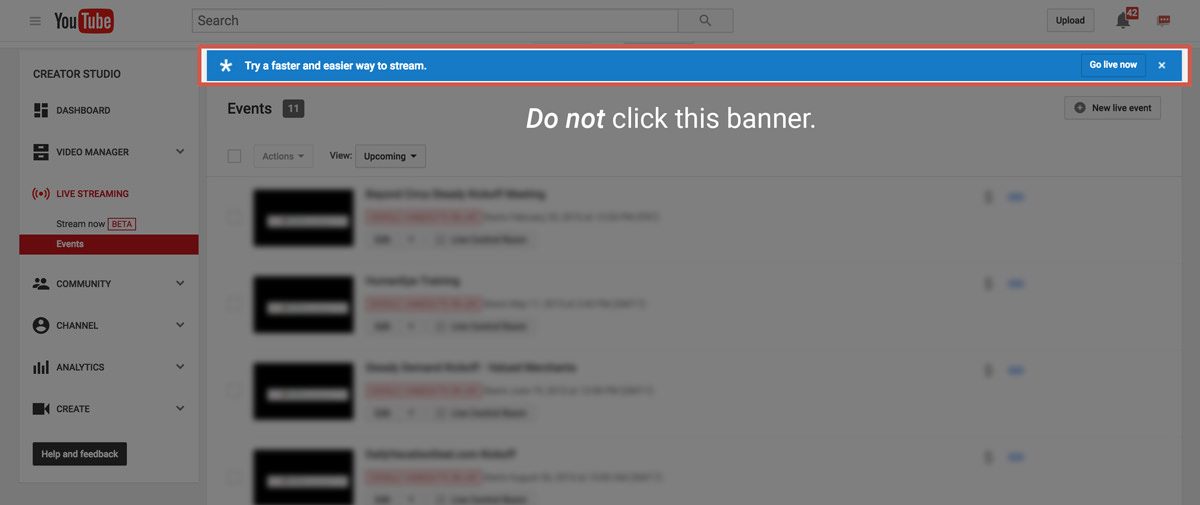
This is not a faster, easier way to stream as it takes you back to the Stream Now (Beta) tab.
If you’ve clicked on the New Live Event button, you will see the following:
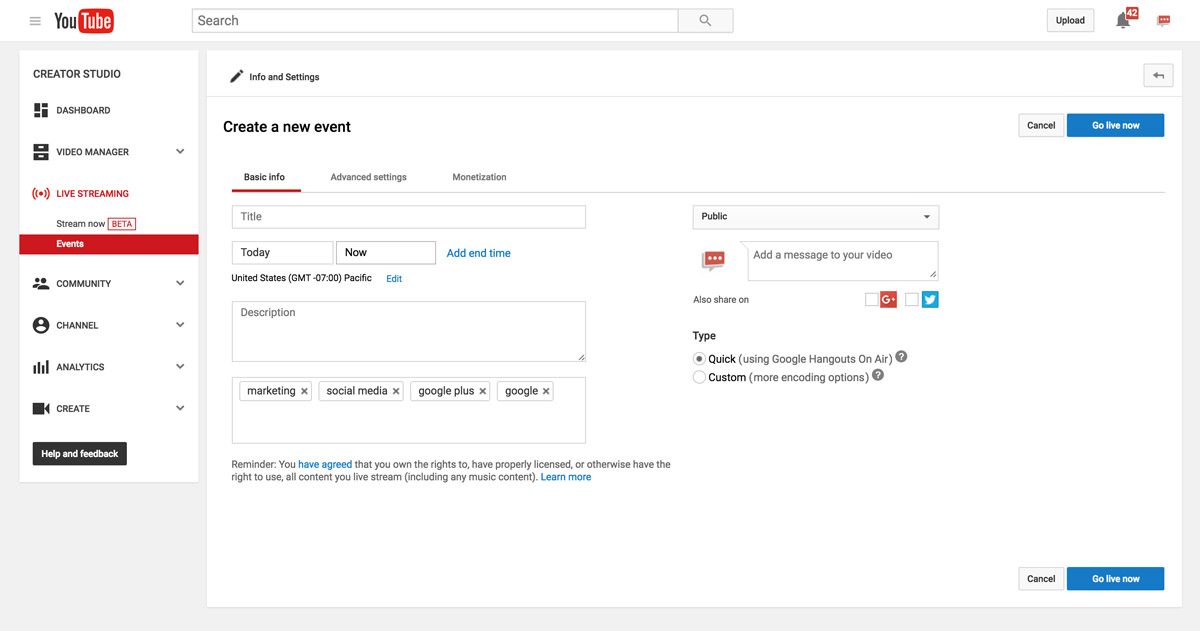
You simply need to go through and fill out all the information about your Live Event.
Basic Info
On the Basic Info tab fill out all of the following fields:
Title: the title of your event and subsequently the title of your video when it is saved to YouTube afterwards.
Time: defaults to Today, Now but if you’re scheduling a live event, you can do so using this field.
Description: give your live event an appropriate description. Just like the Title, this will become the video description once the live event is over and saved to YouTube.
Tags: give your event the appropriate tags so that it will be more easily suggested in recommended videos.
Next you will want to decide what kind of visibility you want your video to have. Choose from Public, Unlisted, or Private.
You can then optionally have your video simultaneously shared on Google+ and/or Twitter once it begins with a message that you’ve pre-written.
Lastly, be sure that the Quick option is selected, which will launch the same Google Hangouts On Air interface that you may already be familiar with, making your live stream as simple as possible to do. The alternative Custom option, again, is for those how have a degree in media broadcasting.
Now, at this point you could just click the Go Live Now Button and skip to Step 3. But I’m going to go over the other settings tabs briefly, just so you know what options you have.
Advanced Settings
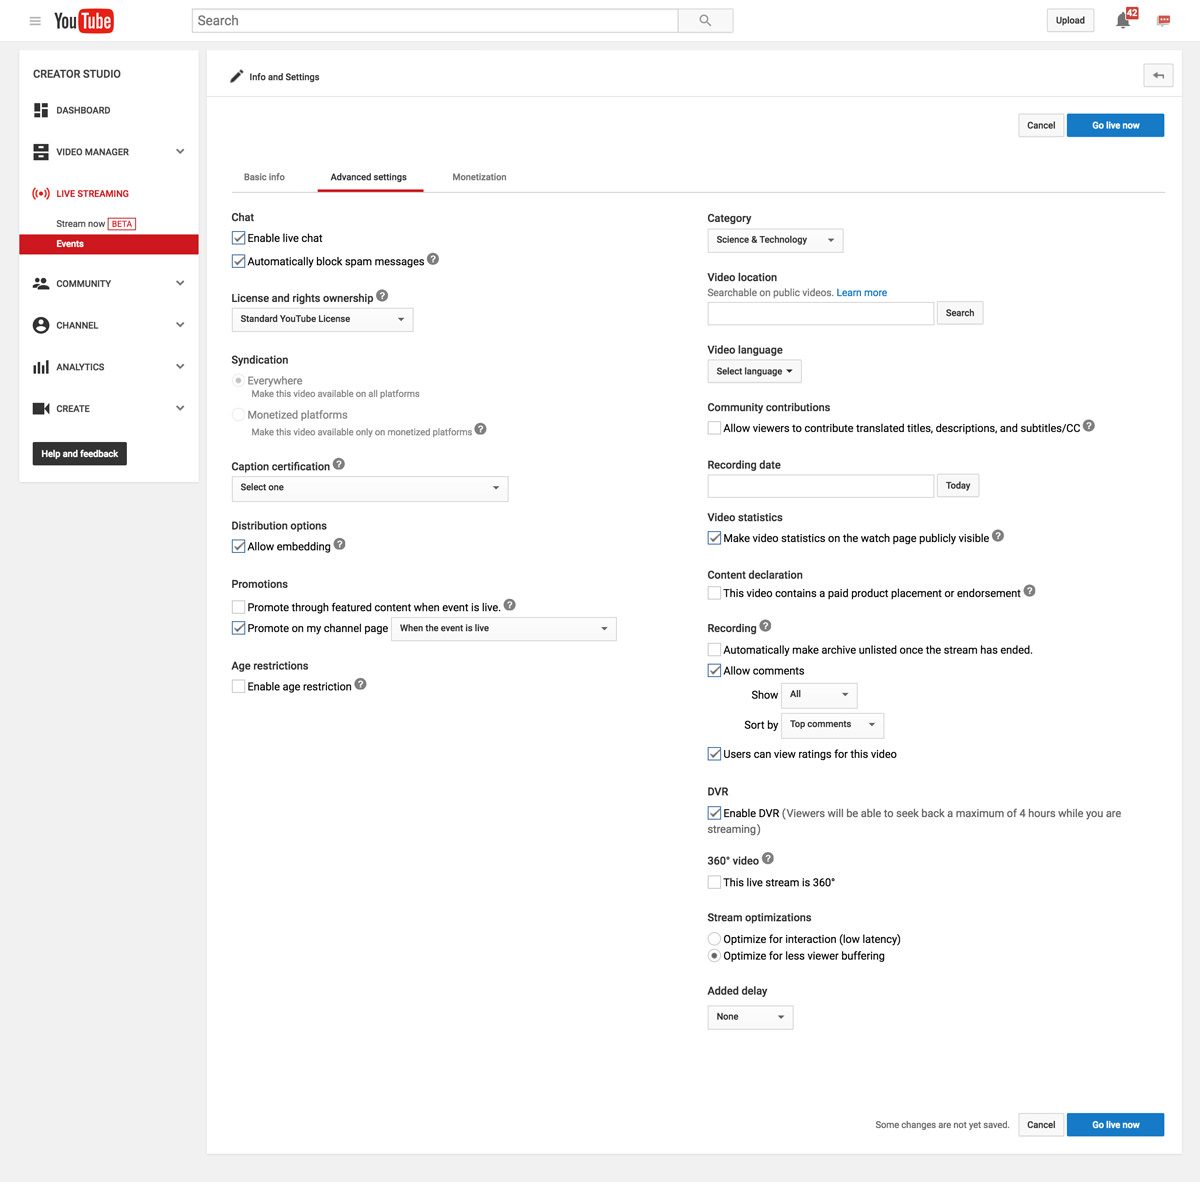
If you want to gain the most possible traction out of your video, you will want to go through each of the options on the Advanced Settings tab before going live.
Chat
You can choose to Enable live chat as well as Automatically block spam messages if you like. I highly recommend enabling both of these options.
License rights and ownership
Basically, you’ll just want to make sure that the Standard YouTube License is selected. Otherwise, the Creative Commons Attribution license will allow people to freely download and re-upload your video content and use it how they please as long as they give attribution to you.
Syndication
You can choose to make your video available Everywhere—on all devices, apps and platforms YouTube videos play—or you can limit the availability to only those devices, apps and platforms that allow for YouTube’s monetization features (we’ll talk about this more later).
Caption certification
You will only need to pay attention to this section if your video content has aired on U.S. television. Since we’re talking about doing a Live Event here, this option is irrelevant.
Distribution Options
If you would like to allow people (including yourself) to embed your video on other sites, just like any other YouTube video, be sure you check this box.
Promotions
You have two options in this section, both of which I recommend enabling.
Promote through featured content when event is live enables your Live Event to be promoted on your other videos if there are users watching your other videos during your live broadcast.
Promote on my channel page gives you a dropdown list of options to promote your Live Event in the following ways:
- When the event is live
- 1hr before the scheduled start time
- 12hrs before the scheduled start time
- 1 day before the scheduled start time
- 2 days before the scheduled start time
- 1 week before the scheduled start time
If your event is not schedule for a time in the future, obviously the only choice is the first option.
Age restrictions
If the content of your video is going to contain age-inappropriate things such as language, alcohol or tobacco use or anything else that might be considered inappropriate for any age, you’ll want to check this box. This will automatically restrict your content to users who are 18 years or older.
In addition to checking this box, the ability to monetize and promote this video “through different ad formats” will be disabled.
Category
This one is pretty self-explanatory, but for the sake of being comprehensive—pick a category that your video will fall under.
Video location
This option allows you to set a geographic location for your video. If you are a local business, we highly recommend this setting as it can give you a search result boost if you’re looking to reach users in your local area.
Video language
Pretty obvious, so we’ll move on to the next item which may not be as obvious to some.
Community contributions
This option, when enabled, allows other users to contribute their own translated titles, descriptions and closed captioning. Because of the unpredictable nature of YouTube users, we don’t recommend this.
Recording date
If you don’t modify this setting, the current date will be used.
Video statistics
If you would like to get all the common stats you would typically get in your YouTube videos, leave this checked. But, honestly, who would uncheck this, right?
Content declaration
If you’re being paid or monetarily compensated in any way to endorse or place a product in this video, you will need to check this box in order to comply with FCC regulations.
Recording
If you want to automatically hide the recording of your video after you end the live event, be sure to check the “Automatically make archive unlisted…” option.
The Allow Comments options obviously only apply if you are making the video available to other users.
If you’d also like to allow users to view the rating, there is a checkbox for that at the bottom of this section.
DVR
Enabling DVR means that during your Live Event people can rewind it back and view up to 4 hrs behind the present broadcast.
360 Video
Yes, that’s an option. I don’t know who in the world is doing this yet, but if you find them I definitely want to watch.
Stream optimizations
These two options can be a little confusing if you’re not familiar with technical video streaming lingo. Here’s how I understand the two options:
Optimize for interaction: this means that YouTube will prioritize real-time over possible delay due to bandwidth constraints. Meaning, if the bandwidth gets low, and the video pauses, it will do so without causing a delay in the feed.
Optimize for less viewer buffering: this allows for YouTube to make an intelligent decision to delay the broadcast for viewers if there is bandwidth issues in order to give as seamless a viewing experience as possible (as little “buffering” as possible). If you select this option you can also force a 30 or 60 second delay to the broadcast to help with this even further.
If you’re looking for live engagement on the event, then you will want to optimize for interaction. But if you’re not looking to interact with the viewers in real time, we recommend choosing to optimize for less viewer buffering.
Monetization
The final options tab in the YouTube Live Event creation process allows you to select if and how your video is monetized.
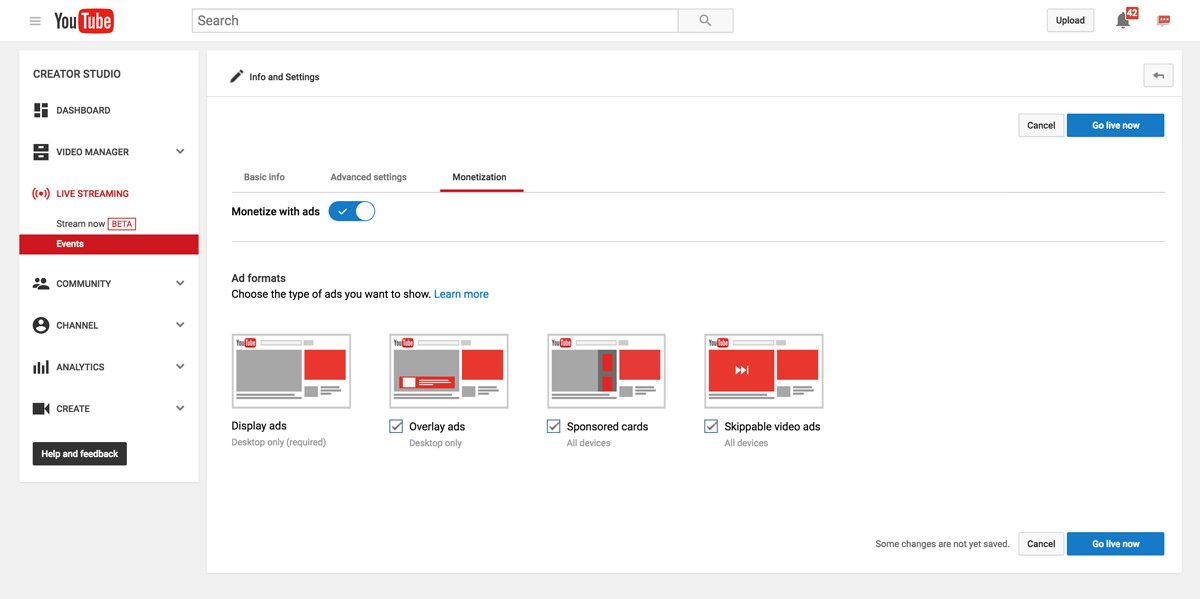
These options are very self-explanatory, so no need to belabor them. Let’s move on to the actual live event!
Step 3: Go Live Now
Once you’ve filled out all your information and configured all the settings that you want, you can finally hit that beautiful blue “Go Live Now” button.

Once you do this, you will see a window pop up letting you know that a Google Hangout On Air is about to launch. This language will likely change soon, but this is what it is for now. Click the blue OK button to proceed.
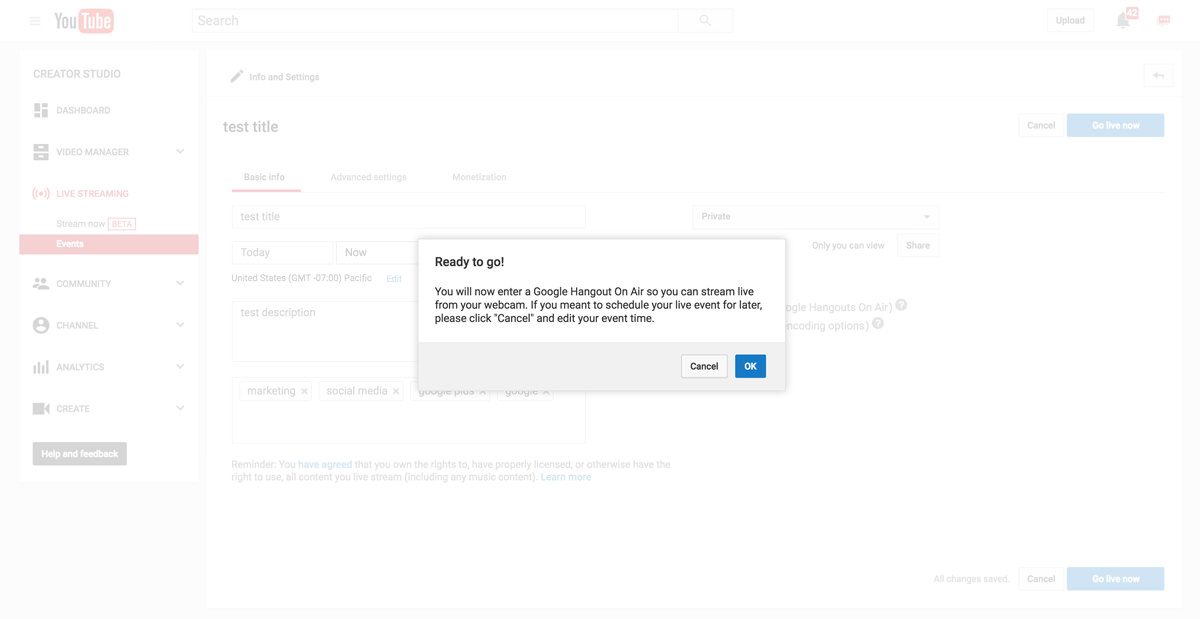
Your Hangout On Air window will pop up, your camera will connect and the app will begin preparing the stream to go live. When it is ready a green Start Broadcast will show up at the bottom of the screen.
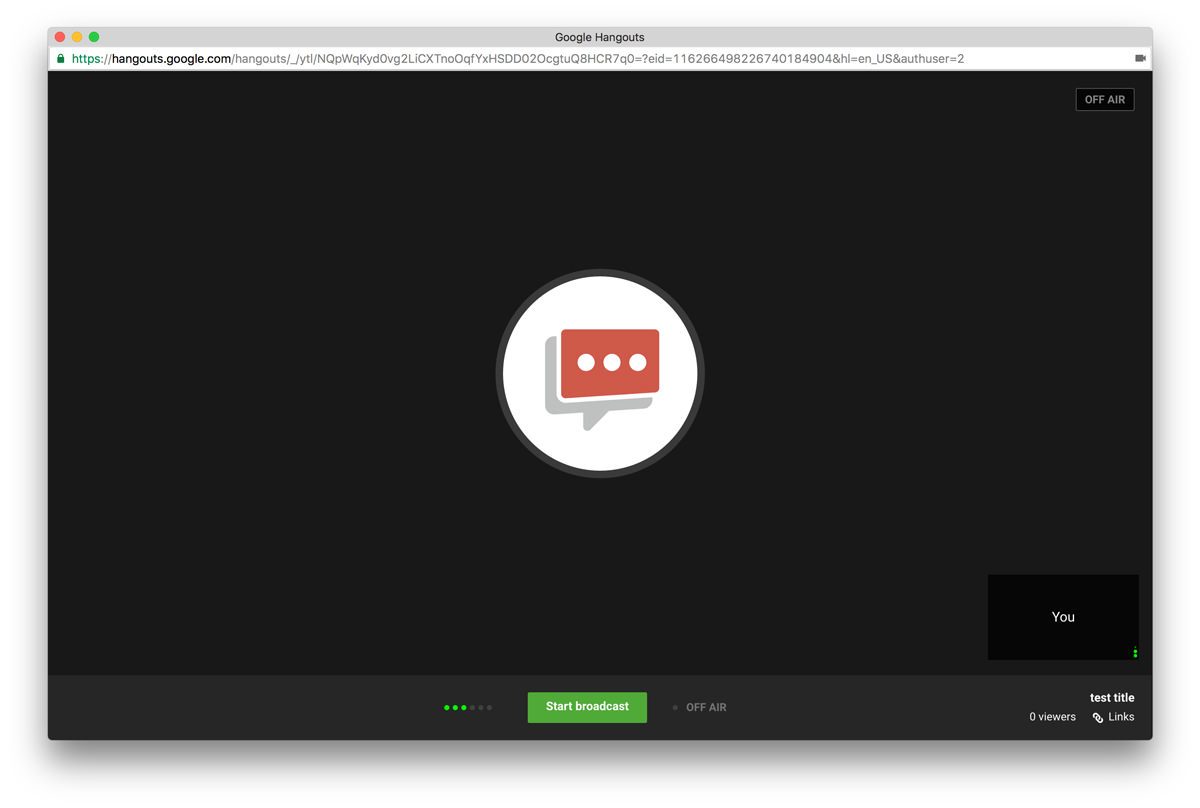
When you click the Start Broadcast button, you will get another message prompt telling you that you’re about to broadcast on YouTube and that you can do so for up to 8hrs. Just click the blue OK button to begin the broadcast.
You may have to wait just a few moments for the LIVE icon to show up, letting you know that you’ve officially begun. Show time!
Proceed with your broadcast until you are ready to end, in which case you can click the red Stop Broadcast button at the bottom.
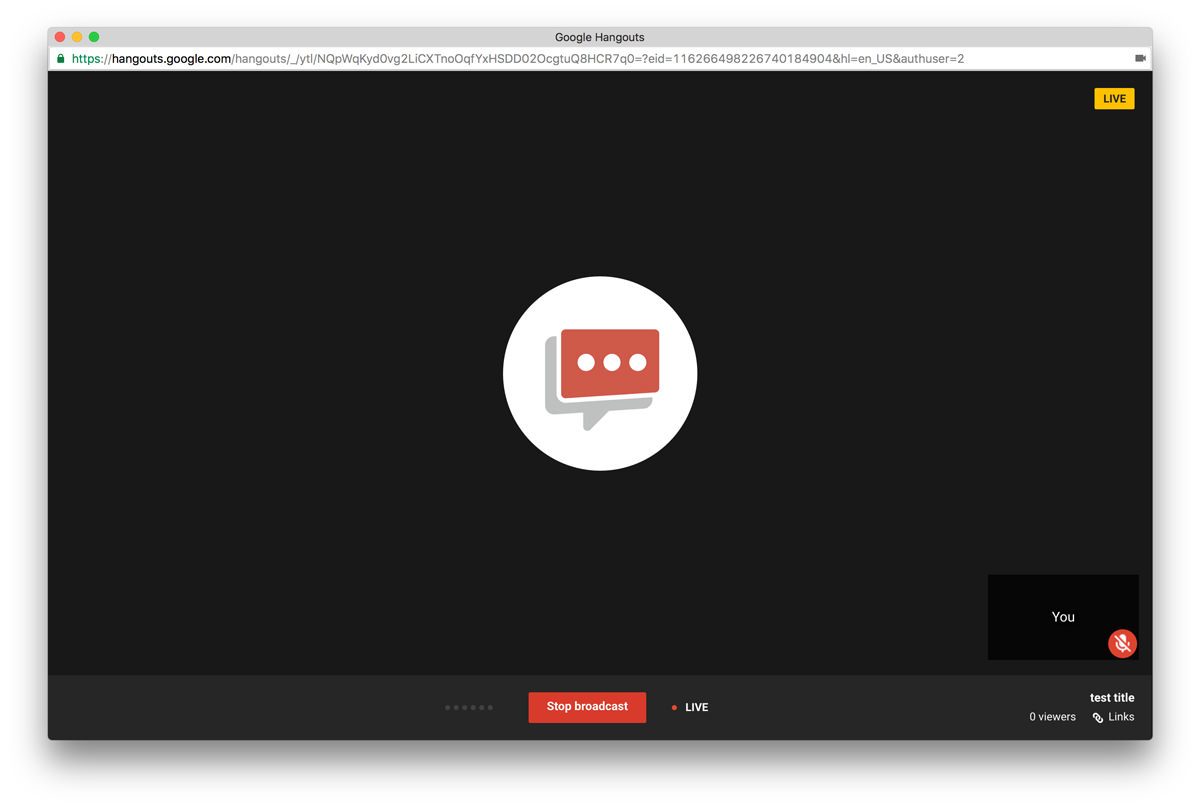
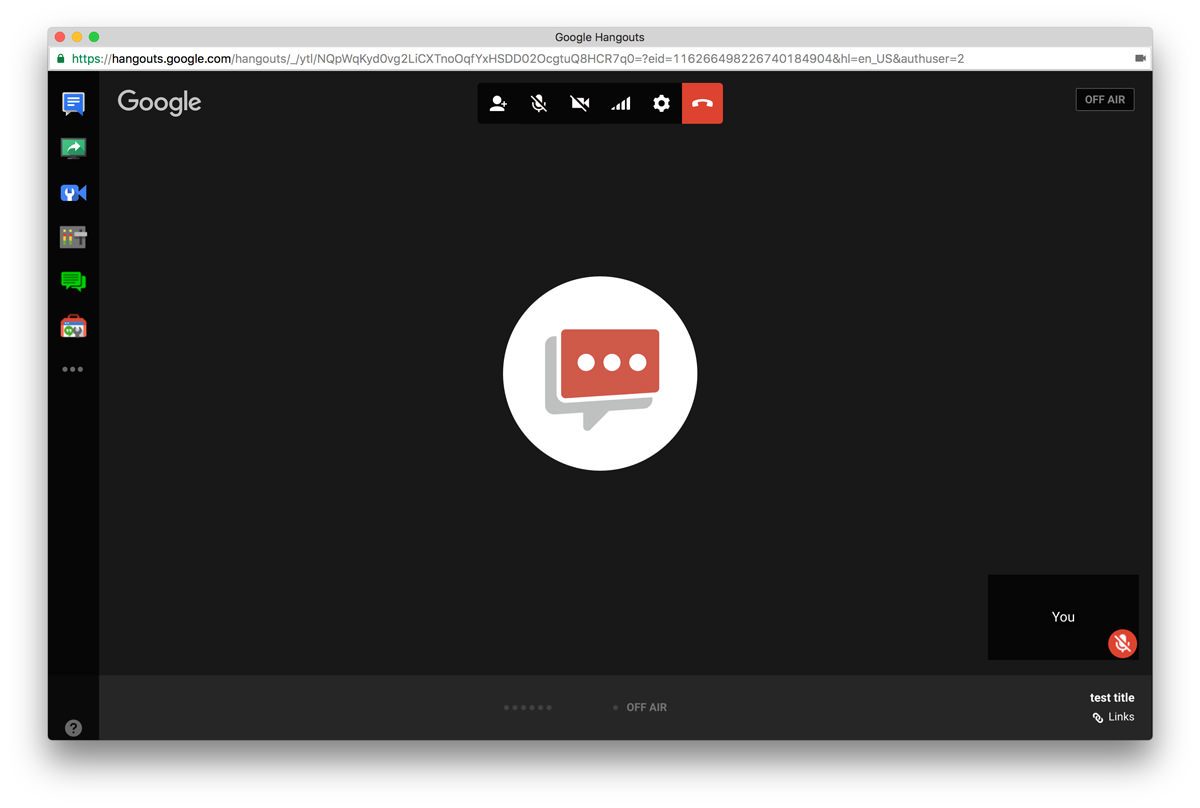
Your Hangout window will remain open and anyone who was also in the broadcast with you will still be able to see/hear each other. Nobody else will be able to see the video stream though.
When you’re ready to leave, you can click the End icon in the top of the screen.
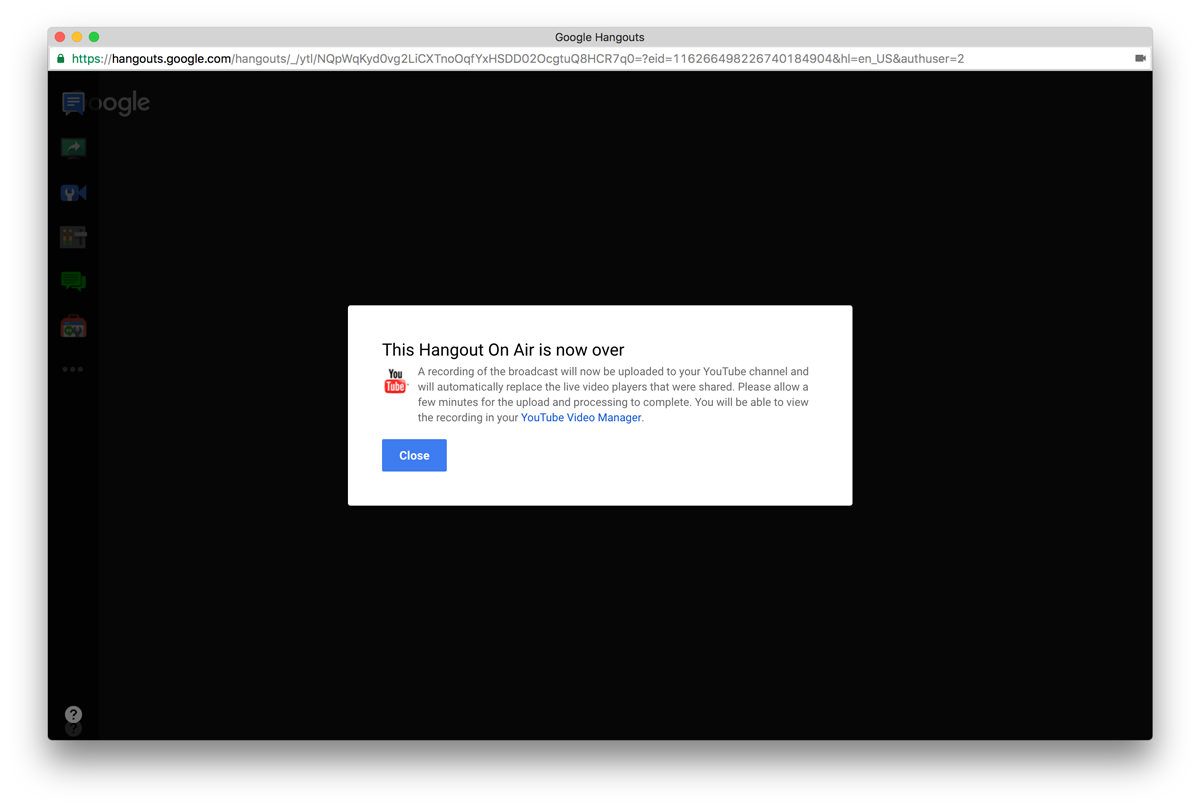
YouTube will give you one last message to let you know what will happen with your recorded video.
Step 4: Do what you want with the recording
Congratulations! You just finished your YouTube Live event and now have a great piece of video content to use in your marketing efforts.
Your recorded live broadcast will now live in your YouTube channel in the capacity you’ve chosen with your setup. You can now manage it just like any other video inside your channel video manager.
Final Thoughts
There are many ways businesses can utilize video content by way of Live Video. If you have any questions about whether or not your brand can benefit from the use of live video content, our team is ready and willing to help.
So what do you think of YouTube Live Events so far? Do you think YouTube has some room for improvement?
